
Welcome to our expert guide on DIY interlocking and flagstone projects in Toronto. Our team is dedicated to helping you create stunning outdoor spaces with interlocking pavers and flagstone. Whether you’re a seasoned DIY enthusiast or just starting out, we have the tips and tricks to make your project a success. We understand the importance of creating beautiful outdoor spaces that bring joy and relaxation to your life. With our guidance, you can transform your backyard into a peaceful oasis or a lively entertainment area.
Our team has years of experience in the industry, and we understand the unique challenges that come with creating DIY interlocking and flagstone projects. Toronto homeowners trust us for our expert guidance and reliable materials. We are your partners in crafting the outdoor space of your dreams.
Key Takeaways
- Create stunning outdoor spaces with DIY interlocking and flagstone projects in Toronto.
- Our expert tips and tricks will help you craft the backyard of your dreams.
- We understand the unique challenges of DIY interlocking and flagstone projects.
- Trust us for expert guidance and reliable materials.
- Transform your backyard into a peaceful oasis or a lively entertainment area.
Why Choose DIY Interlocking Projects?
Are you looking to spruce up your outdoor space but hesitant to hire professionals? DIY interlocking projects might be the perfect solution for you. At Interlocking Toronto, we understand the advantages of tackling these projects on your own.
Cost Savings
By choosing a DIY approach, you can save a significant amount of money on labor costs. Instead, invest in high-quality materials and take pride in creating a beautiful outdoor space with your own hands.
Creative Freedom
When you hire a professional, you are limited to their ideas and design choices. With DIY interlocking projects, you have the creative freedom to choose your own materials, colors, and designs. The possibilities are endless!
Sense of Accomplishment
There’s nothing quite like the feeling of stepping back and admiring a project you completed on your own. DIY interlocking projects provide a sense of accomplishment and pride in your work. Plus, you’ll have a unique and personalized outdoor space to enjoy for years to come.
Ready to unleash your inner DIYer? In the next section, we will provide a comprehensive list of tools and materials needed for your DIY interlocking project.
Getting Started: Tools and Materials
Are you ready to tackle your DIY interlocking project? Before you begin, it’s important to gather all the necessary tools and materials. Here’s a comprehensive list to ensure you have everything you need:
Tools
- Measuring tape
- Shovel
- Wheelbarrow
- Plate compactor
- Circular saw with diamond blade
- Masonry saw
- Chalk line
- Straight edge
- Trowel
- Level
- Rubber mallet
Materials
- Interlocking pavers
- Adhesive
- Edging materials, such as concrete or stone
- Grit sand
- Landscape fabric
- Gravel
- Joint sand
Having the right tools and materials on hand will make the installation process much smoother and more efficient. Don’t forget to wear protective gear, such as gloves and safety glasses, while working with tools.
Planning and Design: The Key to Success
When it comes to DIY interlocking projects, proper planning and design are essential for achieving the desired result. Here are some tips from our experts:
Determine the Space
First, measure the area where you want to install the interlocking pavers. Take into account any curves or angles, as these will affect the number of pavers you need to purchase. With this information, you can create a layout that fits your space exactly.
Choose Your Pattern and Color
One of the best things about interlocking pavers is the variety of patterns and colors available. Consider the overall look you want to achieve and select the pattern and color that best fits your vision. Popular options include herringbone, basket weave, and running bond.
Consider the Foundation
The success of your interlocking project also depends on the quality of the foundation. Take into account the weight that the pavers will bear, and ensure that the foundation is strong enough to support it. If in doubt, consult with a professional or use thicker pavers.
Plan for Drainage
Proper drainage is essential for preventing water from pooling on the surface of your interlocking project. Consider the slope of your yard and the direction of water flow, and plan your project accordingly. You can also incorporate drainage channels or permeable pavers as needed.
By following these tips, you can create a well-planned and beautifully designed DIY interlocking project. Happy crafting!
Preparing the Site: A Solid Foundation
Before you start laying interlocking pavers, it’s essential to prepare the site properly. This stage sets the foundation for your project and ensures its longevity in the long run. Here are the steps you need to follow:
1. Measure the Area
The first step is to measure the area where you want to install the interlocking pavers. Use a measuring tape or a laser level to get accurate measurements. Once you have the measurements, calculate the total square footage of the area to determine how many pavers you will need.
2. Excavate the Area
Next, you need to excavate the area to the required depth, which depends on the thickness of the pavers you’re using. Generally, a depth of 6-8 inches is sufficient. Use a sod cutter or a shovel to remove the grass, soil, and any other debris. Make sure to create a slope away from your house to ensure proper drainage.
3. Add Base Material
Add a layer of base material, such as crushed limestone or gravel, to the excavated area. Spread it evenly and use a tamper or plate compactor to compact it firmly. The base material should be at least 4 inches thick and provide a solid foundation for the pavers.
4. Add Sand Layer
Add a 1-inch layer of sand over the base material and level it using a screed board. This will provide an even surface for the pavers and allow for easy adjustments. Make sure to use coarse sand that is free of debris and organic matter.
5. Compact the Sand
Use a plate compactor to compact the sand layer firmly. This will ensure that the pavers are stable and won’t shift over time. Make sure to add more sand and repeat the process until the sand is compacted firmly.
6. Add Edge Restraints
Install edge restraints around the perimeter of the area to hold the pavers in place. Use plastic or metal edging, and make sure to anchor it firmly to the ground using spikes or stakes. This will prevent the pavers from shifting and maintain the integrity of the project.
With these steps, your site is ready for interlocking pavers. Take your time to ensure everything is level and secure, and you’ll have a stunning outdoor space to enjoy for years to come.
Laying Interlocking Pavers: Step-by-Step Guide
Now that you have prepared the base for your interlocking project, it’s time to start laying the pavers. This is the fun part where you will see your project start to take shape. Here is our step-by-step guide to laying interlocking pavers:
Step 1: Lay the First Row
Starting at a corner of your project area, lay the first row of interlocking pavers along the edge. Make sure they are level and snugly fit together.
Step 2: Add Adhesive
Apply a layer of adhesive to the top of the first row of pavers, making sure to cover the entire surface.
Step 3: Lay the Second Row
Carefully lay the second row of pavers, making sure they fit snugly and are level with the first row. Use a rubber mallet to gently tap the pavers into place.
Step 4: Repeat and Cut Pavers
Repeat the process, row by row, making sure to add adhesive between each row. If necessary, cut the pavers to fit the desired shape using a wet saw or chisel.
Step 5: Add Edging
Once you have laid all the interlocking pavers, it’s time to add edging to your project. This will help keep the pavers in place and prevent them from shifting over time. Choose a suitable edging material and securely install it around the perimeter of your project.
Congratulations! You have successfully laid interlocking pavers for your DIY project. With proper care and maintenance, your outdoor space will look stunning for years to come.
Enhancing Your Interlocking Project: Edging and Borders
Adding edging and borders is a key step in ensuring your DIY interlocking project looks polished and professional. Here are some options to consider:
- Concrete edging: This is a popular and durable option, as it can handle harsh weather conditions. It’s also easy to install and comes in different colors and shapes.
- Stone edging: For a more natural look, consider using stone as an edging material. You can choose from a variety of styles, such as limestone or granite, to complement your interlocking pavers.
- Brick edging: Another classic option is to use bricks as edging. This option is versatile and can be laid in different patterns to create a unique look.
Once you’ve decided on your edging material, it’s important to install it properly. Here are some tips:
- Excavate a shallow trench along the perimeter of your interlocking project.
- Add a layer of sand or gravel to create a level base.
- Place your edging material into the trench, making sure it is level and secure.
- Backfill the trench with soil and compact it to prevent shifting.
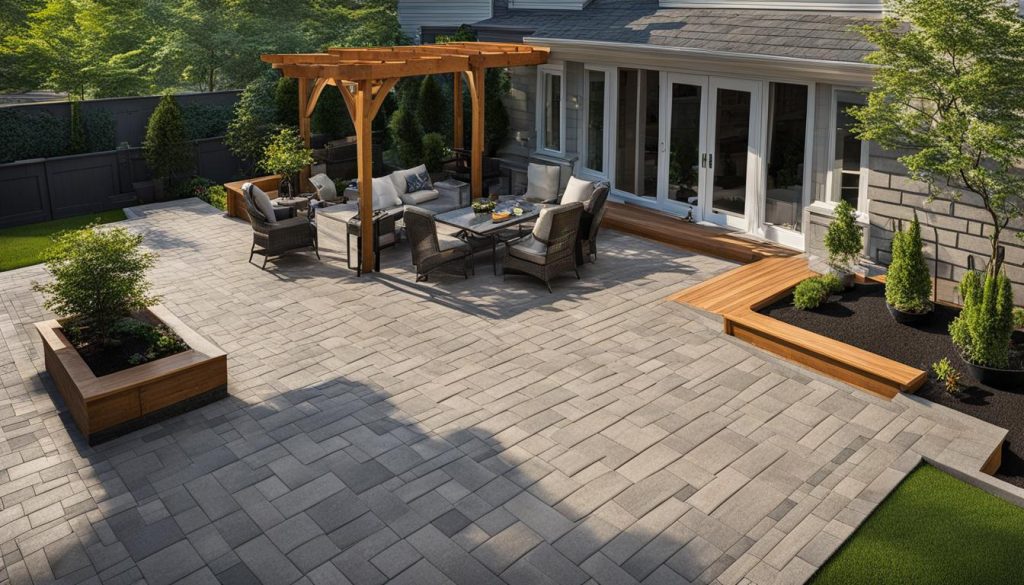
With these finishing touches, your interlocking project will stand out and make a statement. Check out this image of a beautiful interlocking project with stone edging:

Exploring Flagstone: A Timeless Option
When it comes to creating a stunning outdoor space, flagstone is a timeless option that never goes out of style. With its natural beauty and durability, flagstone is the perfect choice for patios, walkways, and even pool decks.
At Interlocking Toronto, we offer a wide selection of flagstone options to choose from, including our popular irregular flagstone and pattern cut flagstone. Our flagstone comes in a range of colours and sizes, so you can create a unique look that reflects your personal style.
One of the great things about flagstone is its versatility. It can be used in a variety of different designs, from rustic and natural to sleek and modern. Whether you want to create a classic look or something more contemporary, flagstone can help you achieve your vision.
Another advantage of flagstone is its durability. It can withstand harsh weather conditions and heavy foot traffic without showing signs of wear and tear. Plus, because it is a natural stone, it requires minimal maintenance to keep it looking its best.

Whether you’re considering a large flagstone patio or a small walkway, our team at Interlocking Toronto is here to help. We offer expert guidance on selecting the right type of flagstone for your project, as well as tips on installation and maintenance.
Irregular Flagstone
Our irregular flagstone is a popular choice for those looking for a natural, rustic look. It is available in a range of colours, including earth tones like brown and beige, as well as grey and black. Its natural irregular shape allows for unique and creative designs.
Pattern Cut Flagstone
For a more formal look, pattern cut flagstone is a great option. It is cut to a specific size and shape, making it easier to install and creating a more uniform appearance. It comes in a variety of patterns and colours to choose from, allowing for endless design possibilities.
At Interlocking Toronto, we are committed to providing our customers with the highest quality materials and expert guidance for their DIY flagstone projects.
Flagstone Installation: Techniques and Tips
Welcome to our guide on flagstone installation techniques and tips. If you’re looking to elevate your DIY project with the natural beauty of flagstone, we’re here to help. With our expert advice, you’ll learn the techniques to ensure a long-lasting and visually stunning installation.
Preparing the Area
Before laying your flagstones, it’s crucial to prepare the area properly. Start by excavating the space to the desired depth, and ensure that the soil is compacted and level. Depending on your project, you may need to add a layer of gravel or sand to provide additional stability.
Laying the Stones
When it comes to laying the flagstones themselves, there are a few key techniques to keep in mind. Start by placing larger stones in the desired pattern, and then fill in the gaps with smaller stones. Be sure to level each individual stone, and use a rubber mallet to tap them into place.

Adding Joints and Mortar
If you want to add joints or mortar to your flagstone project, be sure to choose an appropriate material. Jointing sand is a popular option for filling in between the stones, while mortar can be used to create a more cohesive look. When applying mortar, be sure to work in small sections and clean up any excess with a damp sponge before it dries.
Expert Tips
- Always wear safety goggles and gloves when handling flagstones.
- Be sure to choose stones of uniform thickness to ensure a level surface.
- Consider using a sealer to protect your flagstone from the elements and prolong its lifespan.
- If you’re unsure about any aspect of the installation process, don’t hesitate to consult a professional.
With these techniques and tips in mind, you’re ready to tackle your flagstone project with confidence. If you’re in the Toronto area and looking for high-quality flagstone and expert guidance, don’t hesitate to contact us at Interlocking Toronto. We’re here to help bring your DIY vision to life.
Maintaining Your DIY Projects: Longevity and Care
After all the hard work you put into your DIY interlocking or flagstone project, it’s important to ensure its longevity with proper maintenance. Here are some tips to keep your outdoor spaces looking their best:
Regular Cleaning
One of the easiest ways to maintain your DIY interlocking or flagstone project is by regularly cleaning it. Use a garden hose or pressure washer to remove debris and dirt buildup. You can also use a mild soap solution and a broom to scrub the surface gently. Avoid using harsh chemicals or high-pressure washing, as they can damage the surface.
Sealing
Sealing your interlocking or flagstone project can help protect it from stains and weather damage. Choose a high-quality sealer that’s suitable for your project and apply it according to the manufacturer’s instructions. You’ll need to reapply the sealer every few years to maintain its effectiveness.
Repairs
If you notice any cracks or damage to your interlocking or flagstone project, it’s important to address it promptly. Repair any broken or loose pavers or stones to prevent further damage. You can also replace individual pieces if necessary.
Professional Maintenance
If you’re unsure about how to properly maintain your DIY project, consider hiring a professional to do the job. They can provide deep cleaning, sealing, and overall maintenance to keep your outdoor space looking its best.
By following these maintenance tips, your DIY interlocking or flagstone project will continue to enhance your outdoor space for years to come.
Trust Interlocking Toronto for Expert Guidance
At Interlocking Toronto, we are dedicated to providing you with expert guidance for all your DIY interlocking and flagstone projects in the greater Toronto area. We understand that taking on a DIY project can be daunting, which is why we’re here to support you every step of the way.
Our team has years of experience and a deep knowledge of the best materials and techniques for crafting beautiful and lasting outdoor spaces. From choosing the right interlocking patterns and colors to planning your flagstone layout, we have the expertise to help you bring your vision to life.
Quality Materials You Can Count On
When it comes to DIY projects, having the right materials is essential. At Interlocking Toronto, we pride ourselves on offering only the highest quality interlocking pavers, flagstone, and accessories. Our products are designed to withstand the harsh Canadian weather and provide long-lasting beauty and durability.
Whether you’re looking for classic flagstone or modern interlocking pavers, we have a wide range of materials to suit your style and needs. And if you’re not sure where to start, our team is happy to provide recommendations and advice based on your specific project goals.
Expert Guidance Every Step of the Way
At Interlocking Toronto, we believe that DIY projects should be a fun and rewarding experience. That’s why we’re committed to providing the expert guidance and support you need to make your project a success.
From the initial design phase to the final finishing touches, we’re here to offer advice, answer your questions, and provide assistance whenever you need it. Whether you’re a seasoned DIY enthusiast or just starting out, we’re here to help you every step of the way.
Contact Us to Get Started
If you’re ready to take your outdoor space to the next level with a stunning DIY interlocking or flagstone project, trust Interlocking Toronto to provide the expert guidance and materials you need. Contact us today at (647) 812-9317 to get started on your next project. Let’s craft together!