
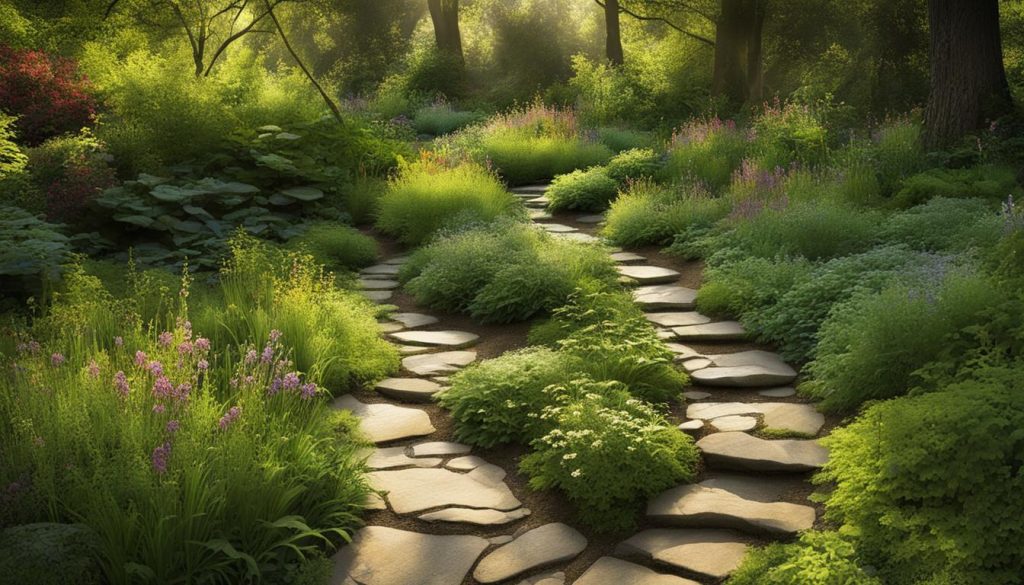
Welcome to our guide on creating flagstone pathways in your garden! If you’re looking to add a touch of rustic beauty to your Canadian backyard, flagstone is an excellent choice. With its durability, natural beauty, and versatility, flagstone pathways are a popular option among Canadian gardeners. In this article, we will guide you through the process of planning, gathering materials, preparing the ground, installing the flagstone, and adding finishing touches to create a stunning garden trail. Let’s get started on your DIY flagstone pathways today!
Key Takeaways:
- Flagstone is a durable, versatile, and beautiful option for garden pathways.
- Proper planning and preparation are crucial for a successful flagstone pathway project.
- Regular maintenance, including cleaning and sealing, is necessary to ensure the longevity of your pathways.
- Safety considerations, such as proper drainage and addressing tripping hazards, are essential for a safe garden trail.
- Interlocking Toronto is a trusted company that can provide assistance and answer any questions you may have about your DIY flagstone pathways project.
Why Choose Flagstone for Your Pathways?
When it comes to creating garden pathways, there are numerous materials to choose from, but flagstone stands out as a top choice for Canadian homeowners.
Flagstone pathways offer several benefits that make them an excellent choice for any garden. Let’s explore some of the reasons why:
Natural Beauty
Flagstone is a natural stone that adds a rustic and charming touch to any garden. The unique patterns and colors of the stone give your pathway a natural appearance that blends seamlessly with the outdoor surroundings.
Durability
Flagstone is a highly durable material that can withstand harsh weather conditions, making it an ideal option for Canadian gardens. When installed correctly, flagstone pathways can last for several years without any need for repairs or maintenance.
Versatility
Flagstone comes in a variety of shapes and sizes, which makes it easy to create a customized design for your garden pathway. Additionally, flagstone is versatile enough to complement any garden style, from modern to traditional.
Overall, flagstone pathways add value to your property while also enhancing the overall aesthetics of your garden.

Planning Your Flagstone Pathways
When it comes to creating flagstone pathways, proper planning is crucial to ensure a successful project. Before you start gathering the necessary materials, take some time to assess the area where you want to install the pathways. Consider the layout of your garden, the natural features of the space, and any potential obstacles that may need to be worked around.
One important factor to keep in mind is drainage. You want to make sure that your pathways are not going to cause water to pool in certain areas. This can lead to damage and erosion over time.
Another consideration is the vegetation around the area. You may need to trim back plants or remove them entirely to make room for the pathways. It’s also important to consider how your pathways will interact with the existing landscaping.
Assessing the Area
The first step in planning your flagstone pathways is to assess the area where you want to install them. Take measurements of the space and note any features that you need to work around, such as trees or garden beds. Consider the flow of traffic through the area and how the pathways will interact with the rest of your garden.
You may also want to think about any design elements you want to include, such as curves or straight lines. This can help you determine the amount of flagstone you will need.
Determining the Layout
Once you have assessed the area, the next step is to determine the layout of your flagstone pathways. This will involve deciding on the size and spacing of your stones, as well as the overall design of the pathways.
Consider using a garden hose or string to lay out the shape of your pathways. This can help you visualize the layout before you start installing the flagstone.
Considering Drainage
Proper drainage is critical when it comes to flagstone pathways. You want to ensure that water will not pool in certain areas, which can cause damage over time.
Consider the natural slope of your garden and how water flows through the space. You may need to adjust the level of your pathways to ensure proper drainage.
It’s also important to use the right materials to create a solid base for your pathways. This can help prevent erosion and ensure that the flagstone stays in place over time.
With proper planning, you can create beautiful and functional flagstone pathways in your garden. Take the time to assess your space and plan out the layout and design of your pathways, and you’ll be sure to enjoy them for years to come.
Gathering Your Materials
Now that you’ve planned out your flagstone pathway, it’s time to gather the necessary materials. Choosing the right materials is essential to ensure that your pathway is not only beautiful but also durable and sturdy.
Flagstone: The star of the show! You can choose from a variety of flagstone types, including sandstone, limestone, and slate. When selecting, consider factors such as color, texture, and thickness. Remember that flagstones vary in size, shape, and weight, so make sure to choose ones that are appropriate for your pathway.
Base material: A sturdy base is crucial to ensure that your flagstone pathway is level and stable. You can use materials such as crushed limestone, gravel, or sand as a base layer. Make sure to compact the base material to prevent shifting or sinking.
Landscaping fabric: To prevent weeds and grass from growing between the flagstones, lay landscaping fabric over the base layer before installing the flagstone.
Tools: You’ll need a variety of tools to complete your project, including a shovel, rake, wheelbarrow, level, and rubber mallet. If you’re a DIY enthusiast, you may already own some of these tools. Otherwise, consider renting them from your local hardware store.
Accessories: Consider adding accessories such as border stones or path lighting to enhance the appearance of your flagstone pathway.
By gathering all the necessary materials, you’ll be well on your way to creating a beautiful, durable, and rustic garden trail.
Preparing the Ground for Your Flagstone Pathways
Before laying out your flagstone pathways, it’s essential to prepare the ground properly. This will ensure that your pathways last a long time and remain stable. Here are the steps to follow:
Clear the Area
Begin by removing any grass or plants in the area where you want to install the flagstone pathways. If there are any large rocks, remove them as well. Use a shovel or a spade to dig up the area, making sure to get rid of any roots or debris.
Level the Ground
Next, use a level to check that the ground is even. If there are any bumps or depressions, you’ll need to fill them in or dig them out. This ensures that your pathways will be level and not have any uneven sections that could be a tripping hazard.
Create a Solid Base
Once the ground is level, you’ll need to create a solid base for your flagstone pathways. We recommend using crushed limestone or gravel to create a base layer. Spread the crushed limestone or gravel evenly over the entire area where you want your pathways to be. Use a plate compactor to pack down the base material, making sure it’s level.
If you are in an area with heavy rainfalls, it’s important to consider proper drainage for your flagstone pathways. You’ll need to ensure that water is able to flow away from the pathways and not collect in low areas.
By following these steps, you’ll be well on your way to creating a stable and durable base for your flagstone pathways.
Installing the Flagstone
Now that the ground is properly prepared, it’s time to start laying down the flagstone for your pathways. Remember to work carefully and take your time to ensure that the stones are level and stable. Here are the steps to installing flagstone pathways:
Step 1: Lay out the Stones
First, decide on the pattern and layout you want for your pathways. Then, lay out the flagstone on the ground in the desired positions. You may need to make adjustments to ensure a good fit and spacing between the stones.
Step 2: Dig Out the Stones
Once you have the pattern and layout set, it’s time to start digging. Use a shovel to remove the soil beneath each stone until it sits flush with the ground. The depth of your digging will depend on the thickness of your flagstone.
Step 3: Add a Base Layer
After each stone is dug out, add a 2-inch layer of crushed stone or gravel to the hole. This will create a firm base that will support the flagstone and allow for proper drainage.
Step 4: Place the Flagstone
Carefully place each flagstone into the hole, pressing it firmly into the base layer. Make sure the stone is level with the ground and that there is enough space between each stone for the filler material.
Step 5: Fill the Gaps
After all the flagstone is in place, it’s time to fill the gaps between the stones with your chosen filler material. This will help stabilize the stones and create a visually appealing finish. You can use sand, gravel, or other materials depending on your preference.
By following these steps, you can successfully install flagstone pathways in your garden. Don’t hesitate to reach out to us at (647) 812-9317 if you have any questions or need further assistance.
Filling the Gaps
Congratulations, your flagstone pathways are almost complete! The next step is to fill the gaps between the stones to create a stable and visually appealing finish.
One option for filling the gaps is sand. To use this method, sprinkle dry sand over the flagstone, making sure to work it into the gaps with a broom or brush. Once the gaps are filled, dampen the sand with a hose, taking care not to wash it out of the gaps. Repeat this process until the gaps are completely filled.
Another option is gravel, which can create a unique and rustic look. You can choose from a variety of gravel types, including pea gravel or crushed stone, depending on the look you are going for. Spread the gravel over the flagstone, making sure to work it into the gaps with a broom or brush. Once the gaps are filled, use a compactor to ensure they are firmly packed.
If you prefer a more natural look, you can fill the gaps with soil and plant ground-covering plants, such as creeping thyme or moss. This will create a beautiful and functional garden trail that blends seamlessly with the surrounding landscape.
Keep in Mind
Whatever method you choose, ensure that the gaps are completely filled and level with the tops of the flagstones. This will prevent tripping hazards and keep the pathways safe to walk on.
Congratulations on completing your flagstone pathways! The next section will explore various ways to enhance the appearance of your garden trail with finishing touches.
Adding Finishing Touches
Now that the flagstone is in place, it’s time to add the finishing touches to your rustic garden trail. These final touches will not only enhance the appearance of your pathways but also make them more functional and safe.
Border Stones
Consider using border stones to define the edges of your pathways. Border stones can add a distinct visual appeal to your pathways while also providing a barrier to prevent the stones from shifting or spreading out over time. When selecting border stones, choose ones that complement the color and texture of your flagstone, creating a cohesive look.
Incorporating Plants
Plants can add a pop of color and texture to your garden trail, softening the edges and creating a natural feel. Consider planting low-growing plants, such as thyme or sedum, in the gaps between the flagstone. This will not only enhance the appearance of your pathways but also help to minimize weed growth.
Pathway Lighting
Finally, consider adding pathway lighting to illuminate your garden trail and make it safe to walk on at night. Solar-powered lights are an excellent option, providing an eco-friendly and cost-effective way to light up your pathways. Choose lights that are designed for outdoor use and that complement the style of your garden.
With these finishing touches, your DIY flagstone pathways will become a stunning addition to your Canadian backyard. Remember to choose finishing touches that complement the natural beauty of your flagstone and add to the rustic feel of your garden trail.
Maintaining Your Flagstone Pathways
Proper maintenance is crucial for ensuring the longevity and beauty of your flagstone pathways. With the right care and attention, your pathways can last for many years to come. Follow these tips to keep your pathways looking their best:
Clean Regularly
Dirt, debris, and plant matter can accumulate on your flagstone pathways over time, detracting from their visual appeal. Clean your pathways regularly with a broom, leaf blower, or pressure washer to keep them looking clean and fresh. Be sure to remove any weeds or grasses that may grow between the stones.
Seal the Stones
Applying a sealant to your flagstone pathways can help protect them from damage due to moisture or harsh weather conditions. Choose a sealant that is appropriate for your specific type of flagstone and apply it according to the manufacturer’s instructions.
Address Issues Promptly
If you notice any damage to your flagstone pathways, such as cracks or loose stones, address the issue as soon as possible. Leaving these issues unresolved can lead to further damage and potentially costly repairs down the road.
Consider Professional Assistance
If you are unsure about how to properly maintain your flagstone pathways, or if you need assistance with repairs or upgrades, consider consulting with a professional landscaper or hardscaping company. These experts can provide guidance and assistance to ensure that your pathways remain in top condition.
By following these tips and keeping your flagstone pathways well-maintained, you can enjoy a beautiful and functional addition to your Canadian backyard for years to come.
Safety Considerations
When planning and installing your flagstone pathways, safety should always be a top priority. Here are some important safety precautions to keep in mind:
Ensure Proper Drainage
Poor drainage can cause water to accumulate on your pathways, leading to slippery conditions and potential injuries. Be sure to assess the area and plan for proper drainage before installing your flagstone pathways. You may need to add drainage pipes or create a slope to ensure water is redirected away from the pathways.
Address Potential Tripping Hazards
While flagstone pathways are visually appealing, they can also create tripping hazards if not installed properly. Make sure all stones are level and stable to prevent any potential accidents. You can also consider adding border stones or other visual cues to clearly define the pathway and prevent accidental trips or falls.
Use Appropriate Lighting
Pathway lighting not only adds a beautiful touch to your garden, but it also improves safety by providing adequate visibility. Consider using solar-powered lights or other low-voltage lighting options to illuminate your flagstone pathways after dark.
Regular Maintenance
Proper maintenance is key to ensuring your flagstone pathways remain safe and beautiful for years to come. Regularly inspect your pathways for any signs of damage or wear and tear, and address any issues promptly. It’s also important to keep the pathways clean and clear of debris to prevent any potential hazards.

By following these safety precautions, you can enjoy the beauty and functionality of your flagstone pathways with peace of mind. Remember to always prioritize safety when working on any DIY project in your garden.
Get Started on Your DIY Flagstone Pathways Today!
Now that you have a comprehensive understanding of the process involved in creating flagstone pathways, it’s time to get started! With a little planning and preparation, you can enhance the natural beauty of your garden with a rustic trail that reflects your unique style.
Begin by assessing the area where you want to create your pathways. Consider factors such as the size, shape, and existing vegetation, and think about how you want to incorporate the flagstone into the design. Take note of any drainage concerns or potential tripping hazards, and plan accordingly.
Next, gather the necessary materials for your project. Determine the type of flagstone you want to use and gather the appropriate tools and supplies. Make sure to prepare the ground properly before laying the flagstone, ensuring a stable and level base for your pathways.
Once the preparation is complete, you can begin installing the flagstone, taking care to space the stones appropriately and ensure they are level and stable. Once the stones are in place, you can fill the gaps with materials such as sand or gravel to create a finished look.
Consider adding your own personal touch to the pathways by incorporating border stones, plants, or pathway lighting. These finishing touches can enhance the overall appearance of your garden trail and make it a unique addition to your backyard.
Maintaining your flagstone pathways is essential to ensure their longevity and beauty. Clean them regularly and address any issues that may arise over time. And don’t forget about safety precautions such as ensuring proper drainage and addressing potential tripping hazards.
At Interlocking Toronto, we are happy to assist you with any questions you may have throughout the process. Contact us today to learn more about creating a stunning garden trail with the help of flagstone. Let’s get started on your DIY flagstone pathways today!